Have you ever tried to display posts from one custom post type on a page template for another custom post type using Elementor? Well, there is one way you can accomplish and that is to display custom posts using a matching taxonomy and post title.
As an example, let’s say you have a custom post type called, Instructor Videos and another custom post type called, Instructors. You want to display videos of a certain instructor dynamically on a page template of “Instructors”. To make this work, you will first need to create a parent taxonomy/category for Instructor Videos. In this case, let’s call it “All Videos”. Then you will need to assign each video a taxonomy/category name (with “All Videos” as the parent) and base it on the name of the instructor. For instance, you may have videos from an instructor named, “John Smith”. Categorize those videos of him with the taxonomy name, “John Smith”.
Now, the second part is that your instructor post title must be the exact same as the name of the taxonomy. So, when you create your custom post within Instructors of the instructor, “John Smith”, “John Smith” is the taxonomy name you create within your Instructor Videos.
The next step is adding some code to your theme’s function.php file. You can copy and paste the code below:
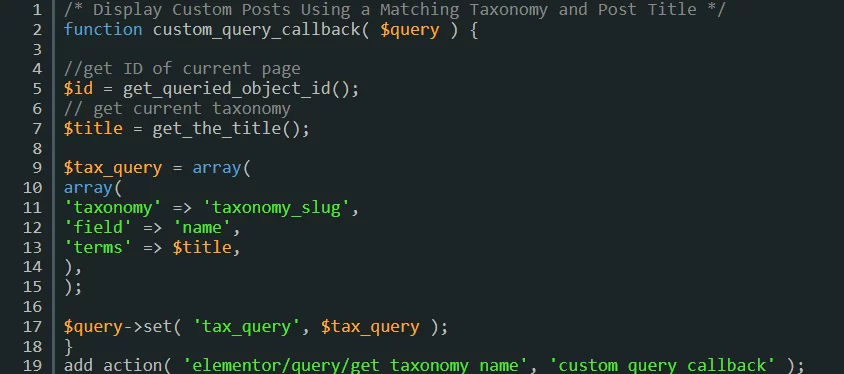
/* Display Custom Posts Using a Matching Taxonomy and Post Title */
function custom_query_callback( $query ) {

//get ID of current page
$id = get_queried_object_id();
// get current taxonomy
$title = get_the_title();

$tax_query = array(
array(
'taxonomy' => 'taxonomy_slug',
'field' => 'name',
'terms' => $title,
),
);

$query->set( 'tax_query', $tax_query );
}
add_action( 'elementor/query/get_taxonomy_name', 'custom_query_callback' );
You will need to change some things to make it work for your site.
You need to change “taxonomy_slug” to the actual taxonomy slug for the taxonomy you created. In our example, “instructor_videos” should be the taxonomy slug of Instructor Videos.
Next, you’ll want to change, “get_taxonomy_name” to the actual name of the taxonomy you assigned. In our example, “all_videos” should be the taxonomy name which is the parent taxonomy/category. However, you will want to keep the “get_” part. So it should look like, “get_all_videos”.